11 minutes
Building this website - Part 3

In the final part to this three-part series titled Building this website. I will complete the remaining steps left over from part 2.
To summarise, the remaining steps are:
- Automate the Hugo build via a pipeline.
- Enable commenting for the blog pages.
- Enable Google Analytics.
- Fix having to wait/manually Invalidate content in CloudFront when new content is added.
Again, feel free to follow along and if you need any assistant reach out to me via the comments section at the bottom of the post.
Build pipeline
In part 2. we went over how to manually edit content, generate the static content using the hugo command and then we manually uploaded that content to our website bucket.
This is far from ideal and was not the happy flow that I wanted when editing website content. So, let’s look at how we can add an automated build pipeline.
Overview
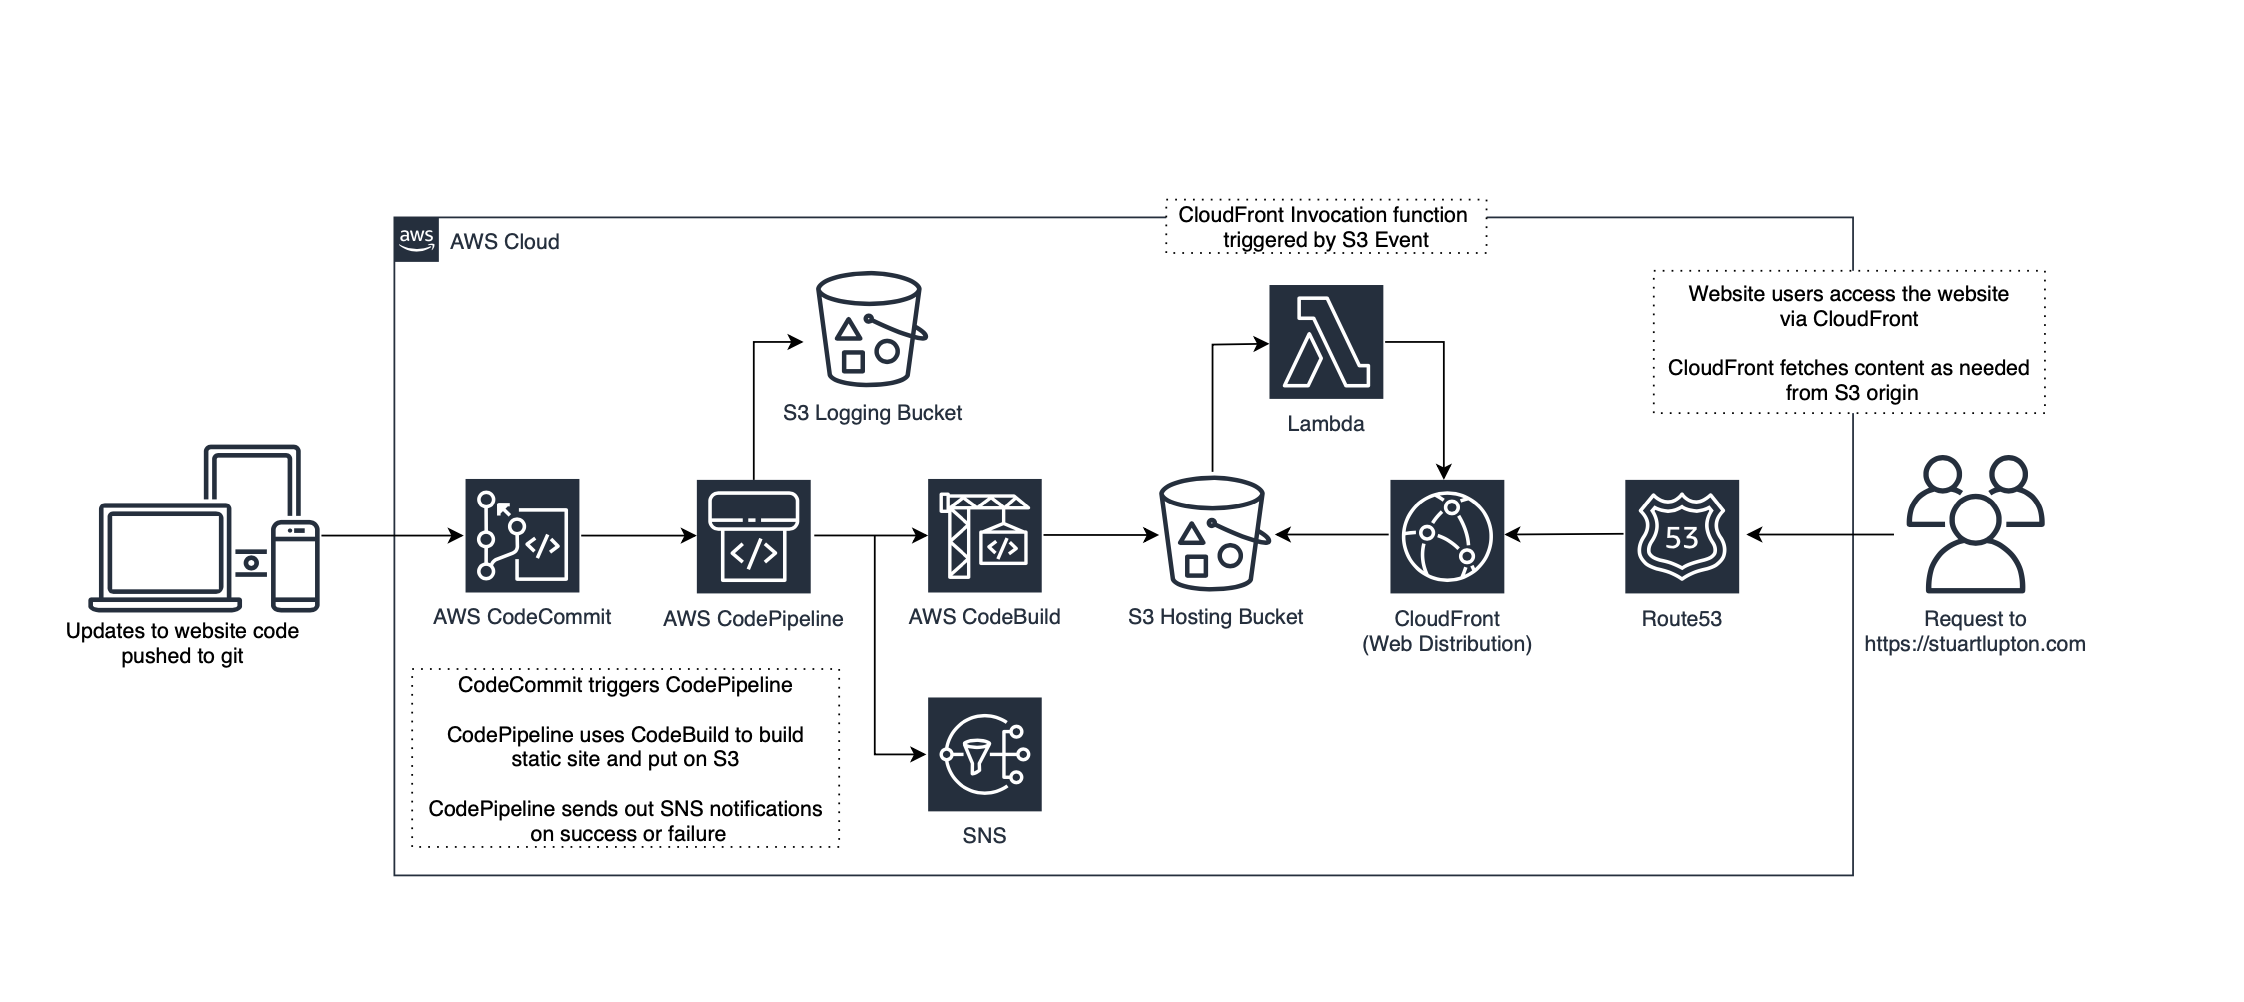
First, we will have a quick review of each service that we intend to deploy and how it will be used to achieve our goal for an automated build pipeline.
AWS CodeCommit - AWS CodeCommit is a fully managed source control service that hosts secure Git-based repositories. We will use CodeCommit to securely store our source code.
AWS CodeBuild - AWS CodeBuild is a fully managed continuous integration service that compiles source code, runs tests, and produces software packages that are ready to deploy. CodeBuild will be initiated by CodePipeline, to run a build task once a source code change is made. This build task will effectively run the hugo command to generate our static content and copy it to our S3 bucket.
AWS CodePipeline - AWS CodePipeline is a fully managed continuous delivery service that enables us to automate release pipelines for our website updates. Think of CodePipeline as the workflow tool that will watch for source code updates and trigger activities such as our CodeBuild task.
AWS CodeCommit
If you remember back to the start of part 2. when we created our new site, we initialized the site repository by using the command git init. Now we need to create a repository in CodeCommit, link our local repo to that and then push our website code up into CodeCommit.
1. Create CodeCommit Repository
Navigate to https://console.aws.amazon.com/codecommit/ and select Repositories.
Click Create repository.
Enter a Name & Description then click Create.
Make a note of the Clone URL for HTTPS, we will need this later on.
Before we get too much further in, its probably worthwhile creating a .gitignore file at the root of your website directory.
This .gitignore file allows us to exclude certain files from ever being pushed to the remote git repository. For example, there is no need for the /public directory to ever be stored in Git. Therefore, if your add the line /public to your .gitignore file this directory won’t be pushed to git in the later steps.
2. Setup Git Credentials
Any activities performed against your CodeCommit repository is performed using an IAM user.
For this task you must use an IAM User with, at a minimum the AWSCodeCommitPowerUser policy attached.
Navigate to https://console.aws.amazon.com/iam/.
Select Users and choose your IAM User.
On the User Details page, choose the Security Credentials tab, and within the HTTPS Git credentials for AWS CodeCommit section, choose Generate.
Copy the username and password that IAM generated for you and store in a secure location. Once you have this recorded, click Close.
3. Connect to your remote repository
Connect your local repository to the remote repository that we created in CodeCommit by using the below command (You should have the Clone URL for HTTPS noted from the previous steps).
Note: Ensure you are in the website root directory.
git remote add origin https://git-codecommit.<region>.amazonaws.com/v1/repos/<your-repo-name>
3. Push website code to your remote repository
Finally, we can push our website code up to CodeCommit.
First, we add files that we have modified to the staging area using:
git add .
Then save changes to your local repository using:
git commit -m <comment such as initial commit>
Now we can push everything to the remote repository using the command:
git push origin master
If that was successful, after a page refresh you should see that your source code is now copied to the CodeCommit repository.
AWS CodeBuild
Next, we will create our build task in CodeBuild. Head over to https://console.aws.amazon.com/codebuild/
Click Create build project and configure as per the below:
| Project Configuration | |
|---|---|
| Project Name | <Name> |
| Description | <Description> |
| Source | |
|---|---|
| Source Provider | AWS CodeCommit |
| Reference type | Branch |
| Branch | master |
| Environment | |
|---|---|
| Environment image | Managed Image |
| Operating System | Ubuntu |
| Service Role | New service role |
| Role name | <role-name> |
| Buildspec | |
|---|---|
| Build specifications | Use a buildspec file |
| Logs | |
|---|---|
| CloudWatch Logs | Enabled |
| CloudWatch Group Name | <groupname> |
| S3 logs | Enabled |
| Bucket | <domain-logs> |
Now our build task is created, we have two remaining steps.
1. Assign S3 permissions to the CodeBuild IAM Role
During the steps to create our CodeBuild task, we created an IAM role, as the CodeBuild task runs under the context of this role we need to ensure it has all the permissions it requires.
In addition to the default permissions assigned, we need to allow the role with write permissions to our website bucket.
Go to the IAM Console - https://console.aws.amazon.com/iam/, find your new role and add a custom policy with the below permissions (make sure you edit to include your bucket name).
{
    "Version": "2012-10-17",
    "Statement": [
        {
            "Effect": "Allow",
            "Action": [
                        "s3:GetBucketLocation",
                        "s3:ListAllMyBuckets"
                      ],
            "Resource": "arn:aws:s3:::*"
        },
        {
            "Effect": "Allow",
            "Action": "s3:*",
            "Resource": [
                "arn:aws:s3:::stuartlupton.com,
                "arn:aws:s3:::stuartlupton.com/*"
            ]
        }
    ]
}
2. Write buildspec.yml file
Now we have our CodeBuild task created we need to write some instructions for the build to use.
At a high level these are going to be:
- Install the hugo binary.
- Generate the site.
- Upload the /public directory files to S3.
This instruction file is called buildspec.yml and it needs to live in the root of your git repo.
Using your favourite text editor, create a file within the root of your website repository called buildspec.yml and populate with the below configuration replacing my bucket name for yours.
version: 0.2

phases:
  install:
    runtime-versions:
      python: 3.8
    commands:
      - apt-get update
      - echo Installing hugo
      - curl -L -o hugo.deb https://github.com/gohugoio/hugo/releases/download/v0.70.0/hugo_0.70.0_Linux-64bit.deb
      - dpkg -i hugo.deb
  pre_build:
    commands:
      - echo In pre_build phase..
      - echo Current directory is $CODEBUILD_SRC_DIR
      - ls -la
  build:
    commands:
      - hugo
      - cd public && aws s3 sync . s3://stuartlupton.com --delete --acl public-read
    finally:
      - echo "Script finished running"
AWS CodePipeline
The final step to complete our build pipeline, is to configure CodePipeline to act as the “glue” that fits CodeCommit and CodeBuild together.
Open your browser and head to https://console.aws.amazon.com/codepipeline/.
Let’s create a new pipeline, click Create pipeline.
Configure the pipeline with the below settings:
| Pipeline Settings | |
|---|---|
| Pipeline name | <Name> |
| Service Role | New service role |
| Role name | <role-name> |
| Source | |
|---|---|
| Source provider | AWS CodeCommit |
| Repository name | <codecommit-repository-name> |
| Branch name | Master |
| Change detection options | Amazon CloudWatch Events |
| Build | |
|---|---|
| Build provider | AWS CodeBuild |
| Region | <region> |
| Project name | <codebuild-project-name> |
| Build type | Single build |
You can Skip the deploy stage.
Finally, review your settings and click Create pipeline.
Now let’s head back to your git repo. Add the buildspec.yml file and commit and push your repo.
git add .
git commit -m "added buildspec.yml"
git push origin master
If everything worked, this should now trigger a build of your site which ultimately gets pushed to S3, Hooray!!!
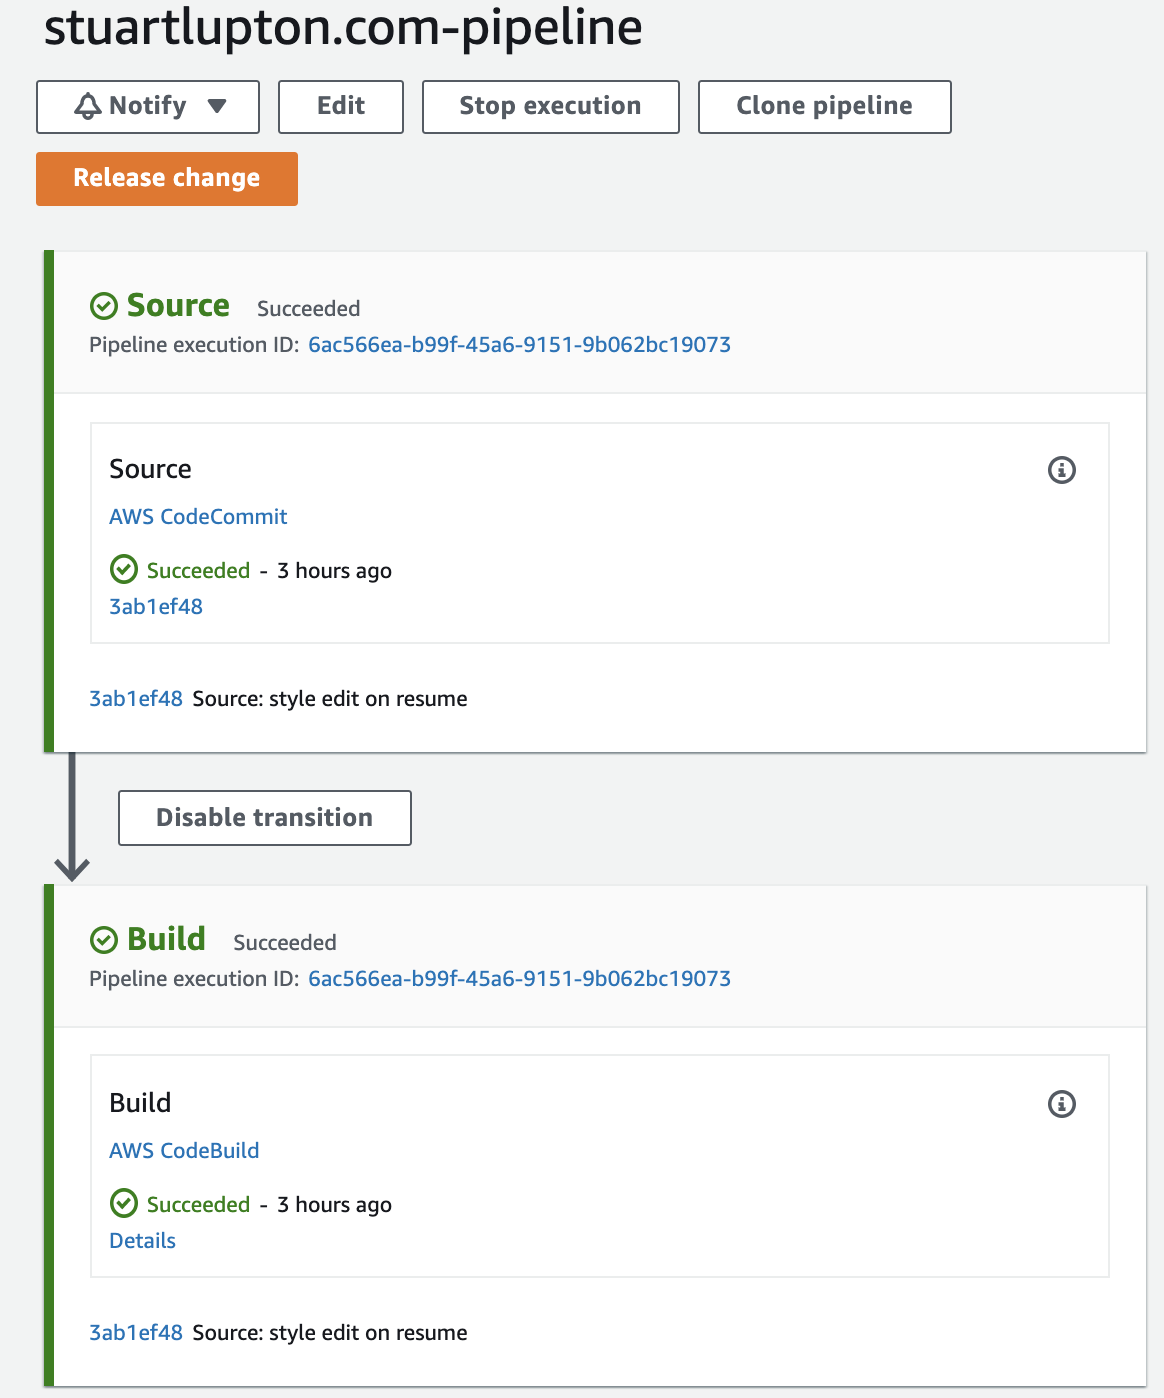
Now every time you push a code change to your codecommit, the pipeline will trigger and your site will be updated without having to take any manual steps. A successful build will look like the following:

If you run into problems that’s where your CloudWatch logs come in handy!
Enable commenting for the blog pages
Comments are an important part of communicating with your audience. This is where static pages struggle a bit as they are immutable by design. To add comments to a Hugo (or any other static) blog, you need to resort to some third-party solution. Disqus is a free comment platform, which works with Hugo out of the box so for version 1 of our website Disqus is the obvious choice.
To add Disqus comments, we need to follow three simple steps.
1. Register with Disqus
Navigate to https://disqus.com/profile/signup/ and signup using your email or with your favourite web federation e.g. Facebook.
Once you have signed up and accepted the Disqus EULA, select I want to install Disqus on my website.
Enter a Website Name and Category.
Select a plan, Basic is sufficient for now.
Finally select I don’t see my platform.. then Configure then Complete setup.
Click edit settings on the website you just created and make note of the Shortname, we will need this for the next steps.
2. Add Disqus details to the website configuration file
Now we have registered and have our Disqus Shortname, we can go ahead and enable comments. This is done within our websites config.toml file.
Enter the following into your config.toml file:
disqusShortname = "<disqus-shortname>"
That’s it for this step!
3. Amend template files to include comments
All we have left to do is to include the comment section in the correct places, as we dont want for this to appear on all our web pages only blogs.
Within your site directory navigate to /themes/layouts/posts/ and edit single.html.
Enter the following lines:
    {{ if .Site.DisqusShortname }}
      {{ if not (eq .Params.Comments "false") }}
        <div id="comments">
          {{ template "_internal/disqus.html" . }}
        </div>
      {{ end }}
    {{ end }}
Once we push changes and our pipeline as completed, we should be greeted with Disqus comments at the bottom of all posts that we make under /content/posts.
Enable Google Analytics
Being able to see statistics on visitors is useful for any web admin, Google Analytics is a great tool with a free plan for basic analytics that will fit most personal website needs.
To enable Google Analytics, we need to follow two simple steps:
1. Create Google Analytics account
To start navigate to analytics.google.com and sign-up for a google account or simply log-in if you already have one.
Once you are logged in, click on Admin in the bottom left-hand corner of your dashboard and click Create Account.
Configure the New Account using the below:
| Account Name | <website-name>-analytics |
| Website Name | <website-name> |
| Website URL | <website-url> |
| Industry Category | <category-that-matches> |
| Reporting Time Zone | <your-timezone> |
Configure your Data Sharing Settings to your preference, once you have done this your Tracking ID should be available - click Get Tracking ID. Make a note of this ID as we will need it in the next steps.
Finally Read and accept the Google Analytics Terms of Service Agreement by clicking I Accept.
2. Enable Google Analytics
Similar to the Disqus comments, enabling Google Analytics works out of the box with Hugo.
Simply add the below to your config.toml:
googleAnalytics = "<your-tracking-id>"
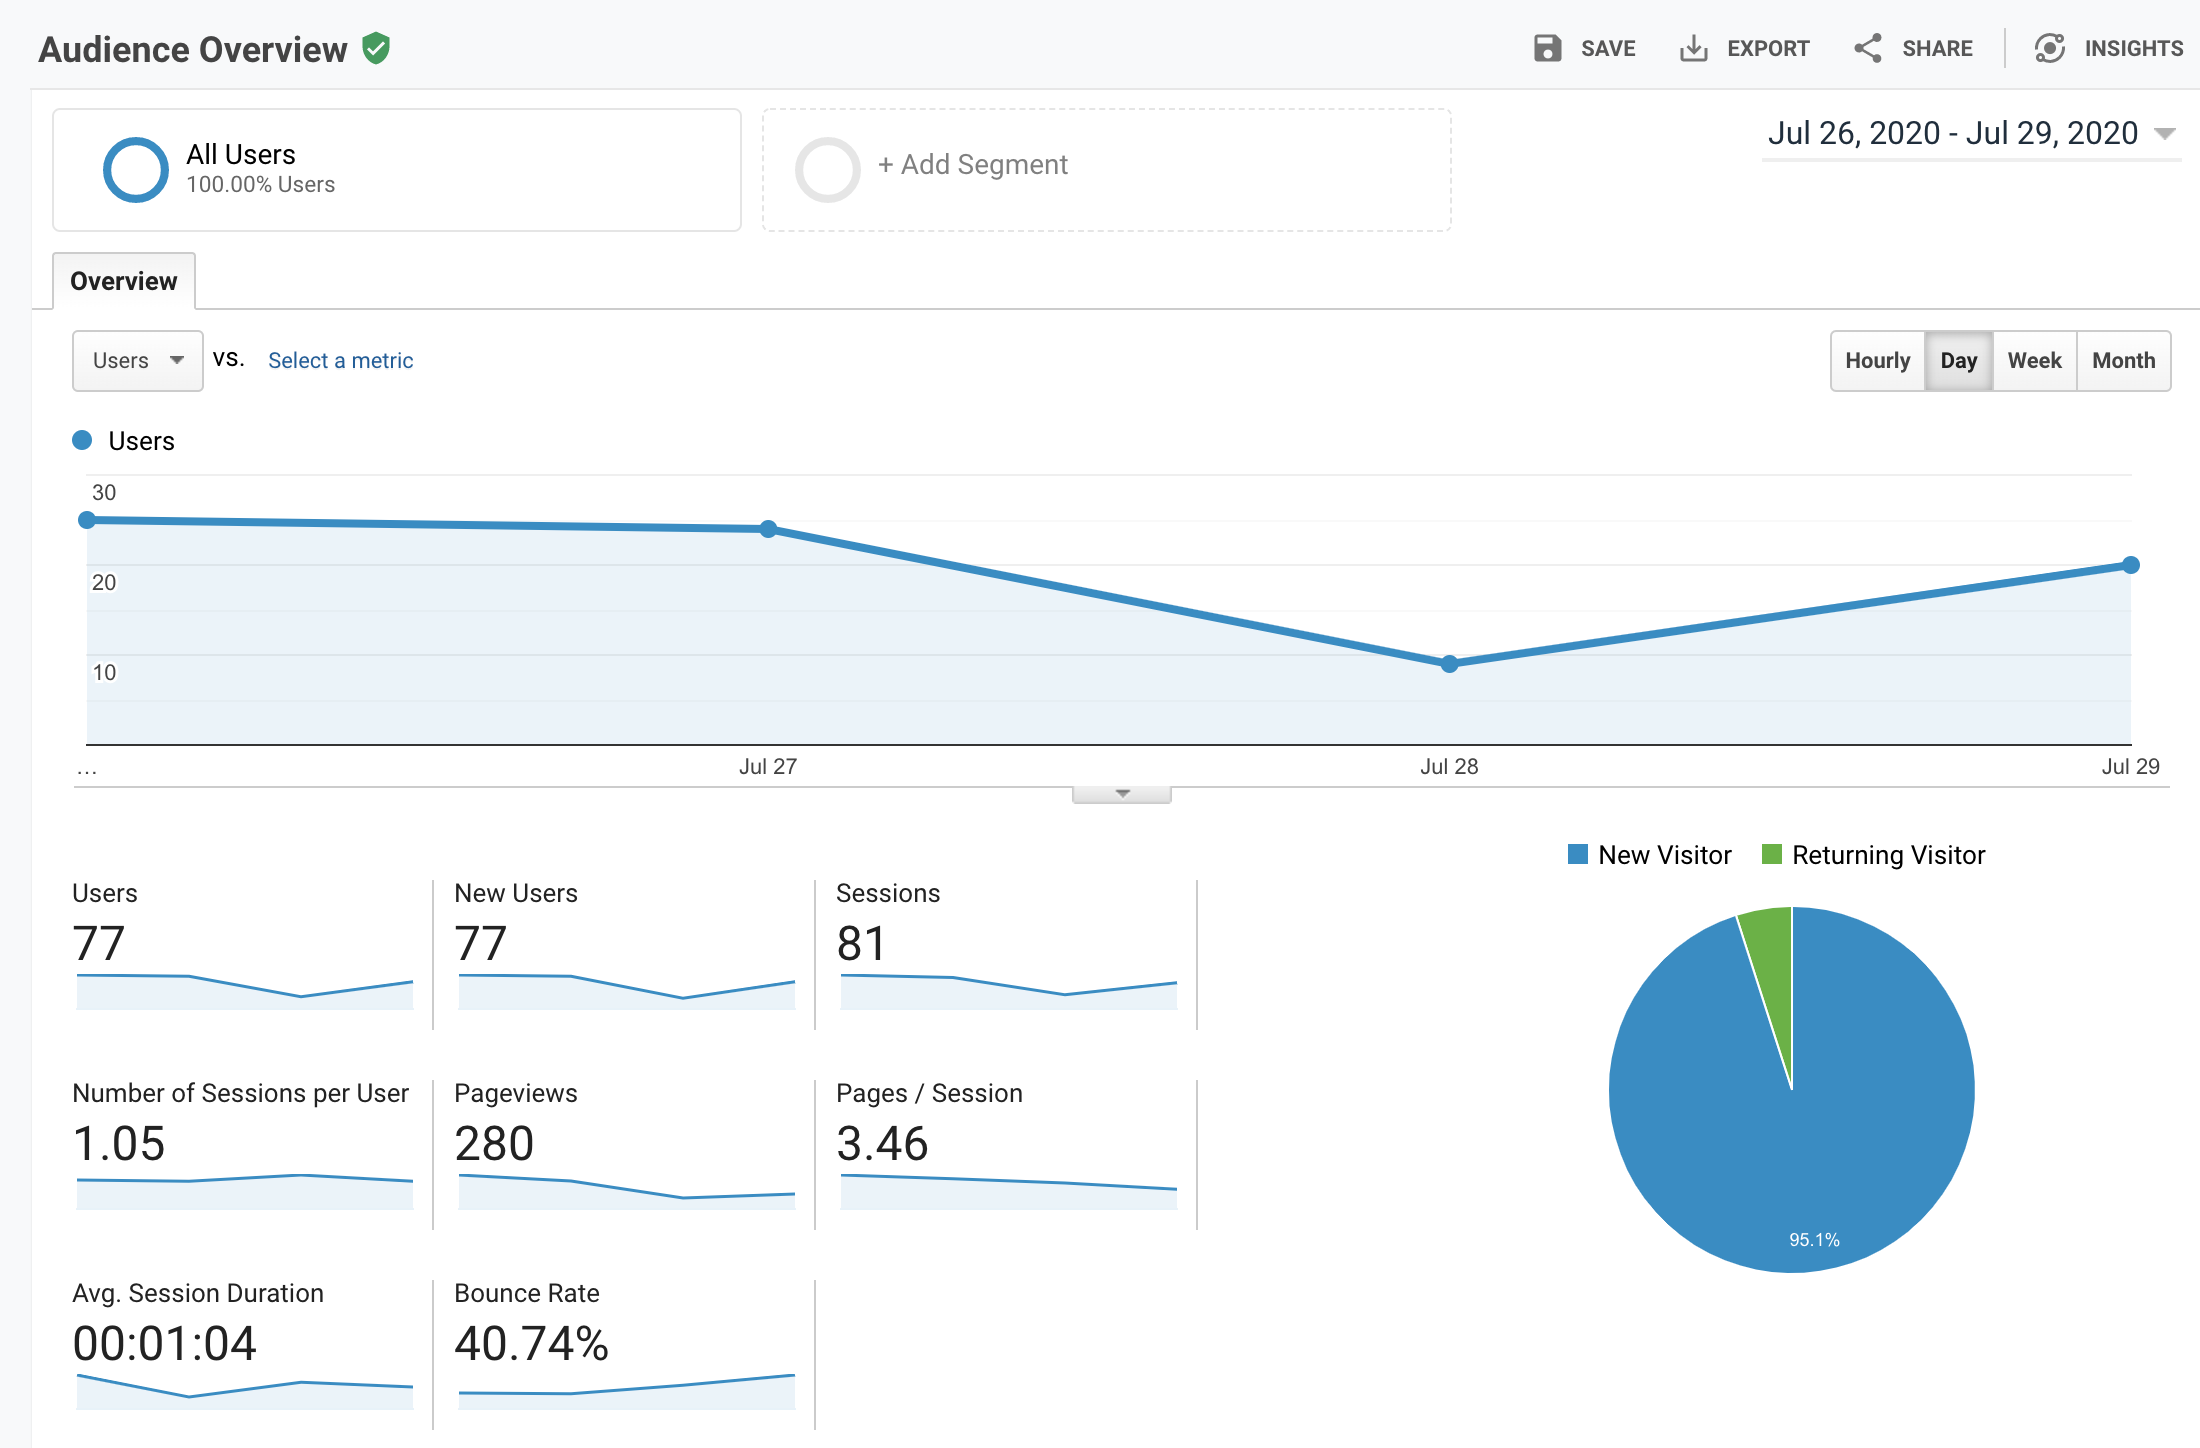
After a short period of time you should be able to view analytics via https://analytics.google.com/ or the mobile app.
This is how it looks.

Note: - Be sure to include a summary of your google analytics usage to your websites privacy statement.
Automate CloudFront Invalidation
For the final step for this blog post, we will create a simple solition to resolve the issue of having to manually Invalidate content within CloudFront once code changes are made.
Having to wait over 30 minutes for the contents TTL to expire is not ideal, neither is having to manually trigger a invalidation.
Let’s do something about that!
We will use the S3 Events trigger to run a Lambda Function in the event of an Object Created event type.
To start, navigate to https://console.aws.amazon.com/lambda/ and click Create a Lambda Function.
With Author from scratch selected, give a Name for your function, then choose Python 2.7 in the Runtime list box.
Leave Create a new role with basic Lambda permissions checked, so a new IAM role will be created to execute the function. Finally, click Create function.
Once your function is created, open the function and paste the below contents into the lambda_function section (swap out the DistributionId for your own), and click save.
from __future__ import print_function

import boto3
import time

def lambda_handler(event, context):
    path = []
    for items in event["Records"]:
        if items["s3"]["object"]["key"] == "index.html":
            path.append("/")
        else:
            path.append("/" + items["s3"]["object"]["key"])
    print(path)
    client = boto3.client('cloudfront')
    invalidation = client.create_invalidation(DistributionId='E34Z7ZY2DHXCWI',
        InvalidationBatch={
            'Paths': {
                'Quantity': 1,
                'Items': path
        },
        'CallerReference': str(time.time())
    })
The last step is to add a trigger, open your function and within the designer click + Add trigger.
Select S3, specify your website-bucket, for the event type select All object create events and finally click Add.
That’s it! When an object is created or modified in the S3 bucket the Lambda function will trigger, the function will look at the S3 event and run an invalidation based on the files changed.
It’s not the most efficient script, but as the first 1,000 invalidations a month are free, I don’t foresee exceeding the free tier.
Next steps
Now we have a pretty decent website up and running, not an instance in sight, we have a pipeline configured so all updates pushed to Git run through an automated build workflow and content is available on the website within a matter of seconds without us having to do anything :)
There are some improvements I would probably look to make in the near future. The lambda function can be made more efficient, some additional security measures that were missed out during the initial build such as encryption of the S3 Buckets, CloudWatch logs etc. I am not overly keen on the performance hit caused by the Disqus comment plug-in loading, maybe I will look for an alternative.
I also plan to write the whole topic out in Terraform, as everything was written manually which I normally only like to do for tests or proof of concepts.
I hope you found this blog mini-series of use, if you have any suggestions for future topics that you would like for me to cover please reach out.
Until my next post, I wish you all health and happiness.
hugoroute53s3cloudfrontcodecommitcodebuildcodepipelinedisqusgoogleanalytics
2338 Words
2020-08-11 00:00 +0000